Contiv(ACI)/Swarm Check-list and Install How-to
Hardware
is same as this blog:
Contiv(ACI)/K8s Check-list and Install How-to
ALL servers is UCS-C
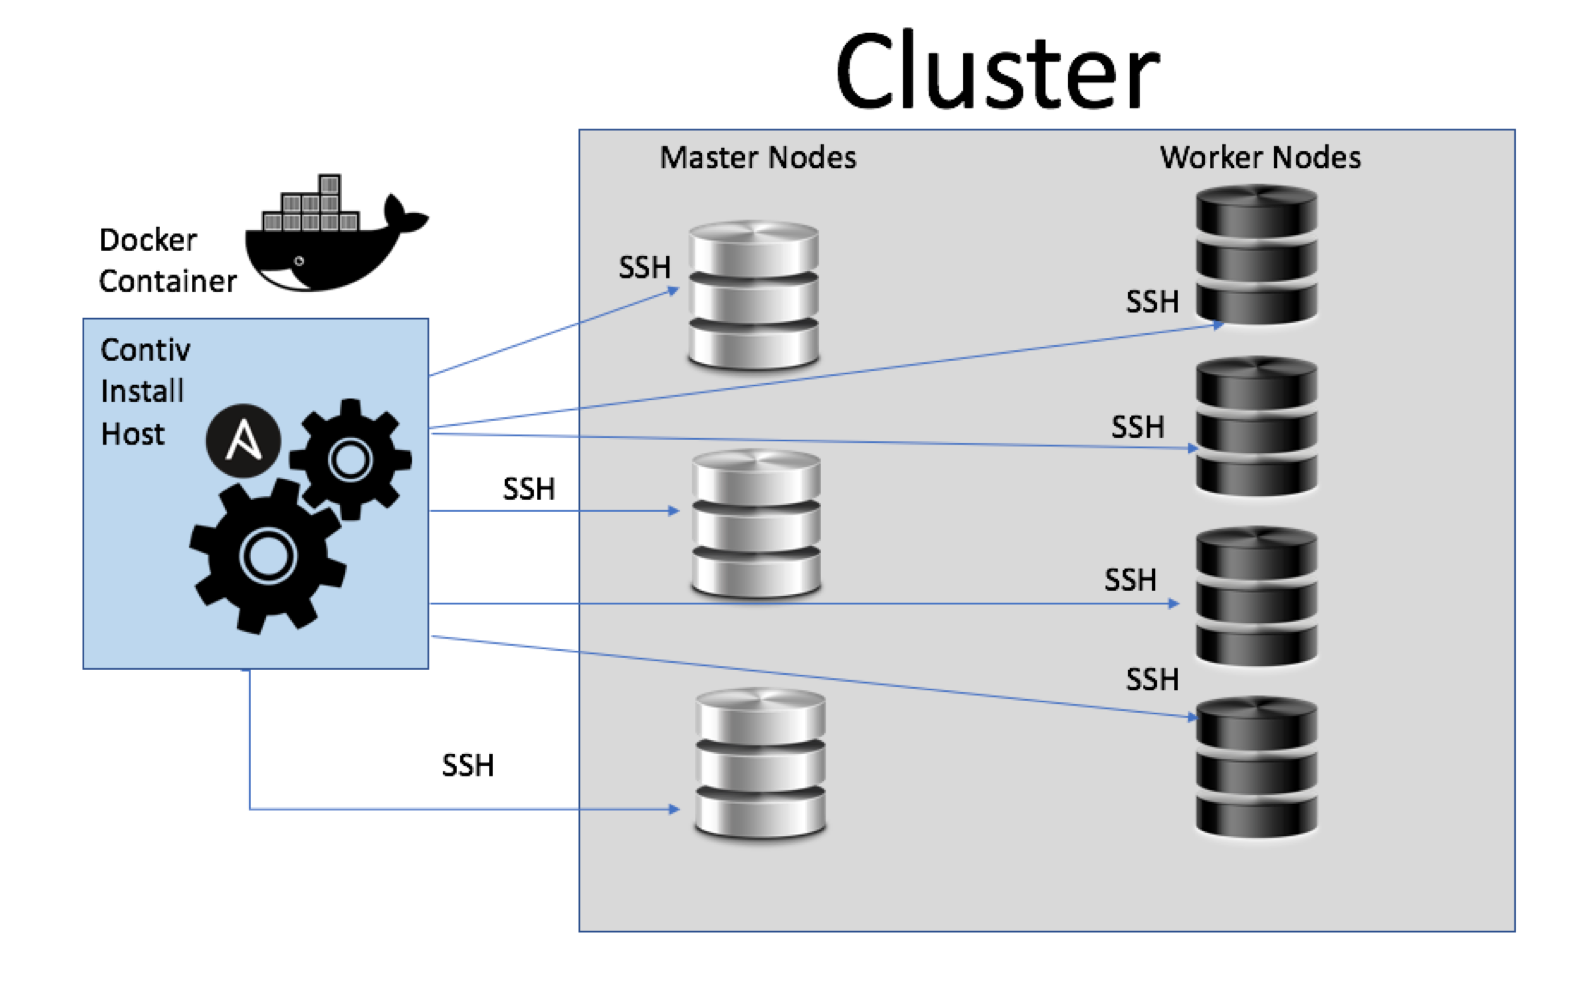
THREE servers for Contiv install host, Swarm Master, Swarm Worker node.
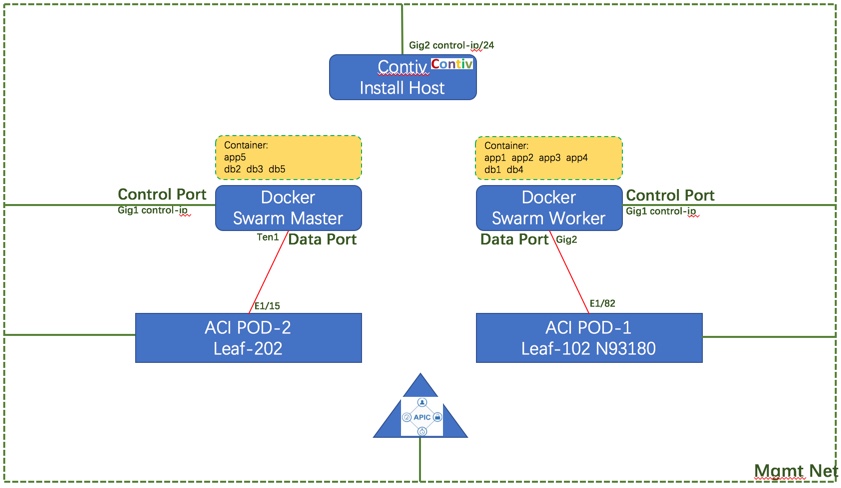
One internet link for each server, same link for Swarm/Worker control interface.
Swarm Master and worker, each has one data link to MultiPOD ACI two pods respectively.
Please notice there is a individual server using as Contiv install host,this server has no other function,such as Swarm or Contiv Master
Picture from here
Software
CentOS: CentOS-7-x86_64-Everything-1611.iso
kernelversion=3.10.0-514.10.2.el7.x86_64,
operatingsystem=CentOS Linux 7 (Core)
Docker, pre-installed on Contiv install host: newest docker-ce from this repo:
https://download.docker.com/linux/centos/docker-ce.repo
[root@master ~]# docker version
Client:
Version: 1.12.6
API version: 1.24
Go version: go1.6.4
Git commit: 78d1802
Built: Tue Jan 10 20:20:01 2017
OS/Arch: linux/amd64
Server:
Version: swarm/1.2.5
API version: 1.22
Go version: go1.5.4
Git commit: 27968ed
Built: Thu Aug 18 23:10:29 UTC 2016
OS/Arch: linux/amd64
Contiv: contiv-full-1.0.0-beta.3.tgz , from here
https://github.com/contiv/install/releases/download/1.0.0-beta.3/contiv-full-1.0.0-beta.3.tgz
ACI: multi-POD,2.2(1n)
Topology
if no pic, pls open it in new browser windows
Swarm master physical server, also acts as Contiv Master and Swarm worker.
1. Install Host: Again, this is a separate Server
2. Interenet Access: nodes need internet access when the installation takes action,while in production environment there should be something like proxy.But in my lab, i just make the mgmt interface also can access internet.
3. installation role: in production environment there should use a user id other than root. If that you should make this user , from the install host, can do SSH Passwordless Login to the other target Linux host. I just used the root.
pre-Configuration after install CentOS on Master/Worker
Notice: doesn’t include the Install host
Part-1:
1. host env
vi /etc/hosts , make sure:
127.0.0.1 localhost
192.168.151.151 Master Master.localdomain
more /etc/hostname make sure the same as above.
2. diable firewall & SELinux
systemctl disable firewall
vi /etc/selinux/config, configure SELINUX=disabled
3. REBOOT the Server.
Part-2:
1. config repo
wget https://dl.fedoraproject.org/pub/epel/epel-release-latest-7.noarch.rpm
rpm -Uvh epel-release-latest-7.noarch.rpm
2. install required packages
yum -y install bzip2
easy_install pip
pip install netaddr
yum -y install python2-crypto.x86_64
yum -y install python2-paramiko
3. update OS
yum makecache
yum -y upgrade
4. install LLDP protocol
In case ACI network, lldp can tell their neighbors for Leaf and server,its helpful for us to do post-install-config the Contiv.
cd /etc/yum.repos.d/
wget http://download.opensuse.org/repositories/home:vbernat/RHEL_7/home:vbernat.repo
yum -y install lldpd
systemctl enable lldpd
systemctl start lldpd
lldpcli show neighbor
pre-Configuration after install CentOS on Install Host
1. same to the above Part-1
2. install docker
[root@contiv ~]# yum-config-manager \
--add-repo \
https://download.docker.com/linux/centos/docker-ce.repo
[root@contiv ~]#yum -y install docker-ce
[root@contiv ~]#systemctl start docker
[root@contiv ~]#systemctl enable docker
[root@contiv ~]#chkconfig docker on
[root@contiv ~]#sudo usermod -aG docker root
[root@contiv ~]#pwd
/root
3. download the Contiv package
[root@contiv ~]#curl -L -O https://github.com/contiv/install/releases/download/1.0.0-beta.3/contiv-full-1.0.0-beta.3.tgz
You can find the newest version.
[root@contiv ~]#tar -zvxf contiv-full-1.0.0-beta.3.tgz
4. Config the Contiv env
switch into the Contiv directory
[root@Contiv contiv-1.0.0-beta.3]#pwd
/root/contiv-1.0.0-beta.3
ifconfig
to confirm the phy interface name for control and data plane on Master and Worker nodes.
[root@Contiv contiv-1.0.0-beta.3]#vi cfg.ymlCONNECTION_INFO:
master-ip:
role: master
control: enp8s0f0
data: enp2s0f0
worker-ip:
control: enp7s0f0
data: enp7s0f1
APIC_URL: “https://apic-ip:443”
APIC_USERNAME: “apic-username”
APIC_PASSWORD: “apic-password”
APIC_PHYS_DOMAIN: “phy-contiv” APIC_EPG_BRIDGE_DOMAIN: “not_specified”
APIC_CONTRACTS_UNRESTRICTED_MODE: “no”
APIC_LEAF_NODES: - topology/pod-1/node-101
- topology/pod-1/node-102
- topology/pod-2/node-201
- topology/pod-2/node-202
5. install Contiv from Contiv install host:
keep calm and waiting until you see…
Installation is complete
Please export DOCKER_HOST=tcp://master-ip:2375 in your shell before proceeding
Contiv UI is available at https://master-ip:10000
Please use the first run wizard or configure the setup as follows:
Configure forwarding mode (optional, default is bridge).
netctl global set –fwd-mode routing
Configure ACI mode (optional)
netctl global set –fabric-mode aci –vlan-range
Create a default network
netctl net create -t default –subnet=
For example, netctl net create -t default –subnet=20.1.1.0/24 default-net
Congratulation that you can go into the Contiv/Container World!